RevenueBot settings
To create and customize any bot on the platform RevenueBot You must first register on the website revenuebot.io. The button to start registration is at the top, next to the language selector. Registration is possible via social networks or e-mail. In either case, you will receive an email with a link to activate your account.
Important: Before you create an account, you should read the “User Agreement”, because you have to agree with it in order to register.
Using the link in the email, the user goes straight to the account dashboard, no additional actions are required. At the bottom left of the page a pop-up window will appear that describes how to work on the platform.
Settings for Binance
On the main page on the left is the navigation bar. The first section in it is the “Control Panel”, which will be needed when Bot for cryptocurrency trading or several bots will already be created. A bot can be created and activated in the next section – “Quick Start”. You can also create a bot in the “Bots” section, this page will contain all of the configured bots of the user.
On the site you need to enter in the line “Bot name”, immediately activated the second line with a drop-down menu, from which you will need to select crypto exchange, in this case Binance. Once an exchange is selected, RevenueBot shows the conditions that need to be met to create and configure for Binance:
- the user must have free tokens on the balance of the exchange BNB;
- the exchange account must include payment of commissions in BNB;
- the number of BNB tokens must be at least 1% of the deposit intended for trading the bot.
Note that all this is possible if the client has a verified and verified Binance account. If there is money on RevenueBot BNB account, then in the drop-down menu you also choose a pair in which you are supposed to trade. Next, you have to choose an API key, from those already created, or create a new one in a separate section in the navigation menu on the left. How to create it and why it’s needed is explained in the instruction near the key selection service. According to the selected API key you can check the balance of the exchange, when putting the amount or percentage of the deposit.
Under the API is a service to connect the wallet, which is created here or in a separate section of the navigation bar on the left. When you connect a wallet, you specify:
- wallet name;
- comment (optional);
- exchange (choose from the list);
- crypto coin (select from the list);
- amount or percentage to trade from the deposit in the exchange account;
- choose the option of the exchange commission.
The wallet acts as a deposit that holds as much money as the user plans to spend on trading.
How do I customize the bot algorithm?
After defining the API, wallet and other parameters, you can configure the bot for trading. There are two basic algorithms: Long and Short. When you choose the Long algorithm, the bot buys the asset in installments as the price decreases. The Short algorithm is based on the same principle, but it sells the asset in portions, more and more as the price rises. That is, the Martingale strategy is practically used.
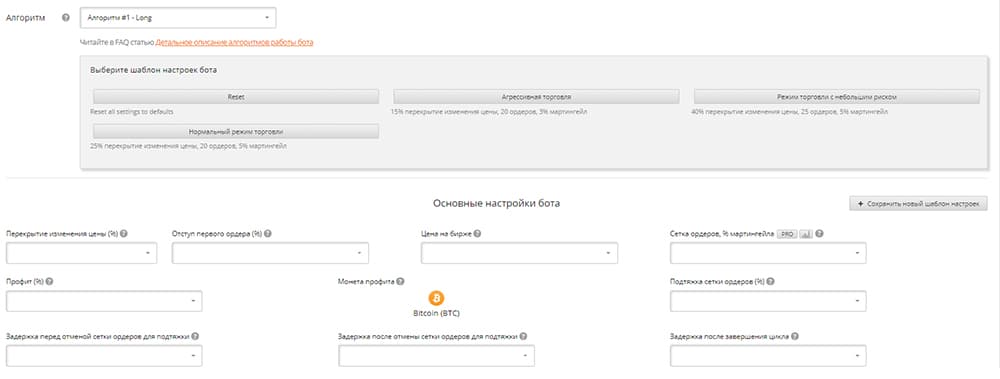
At the top of the settings page you select the algorithm. After that a pattern is selected, in this list “Reset” is not a pattern, but a reset of settings to default values. “Normal trading mode” assumes medium risk, moderate profit. “Aggressive trading” implies faster and more frequent selling or buying and higher risk.
“Low-risk trading mode” implies a lower frequency of transactions and the possible profit is less, as a payment for the reduced risk of losses. These bot settings are filled in automatically when selecting the algorithm and template bot settings. But a trader can set values independently to implement their own strategies, including scalping settings can be generated.
By changing the Martingale overlaps, first order indents, delays after the end of the cycle, indents, number of orders, and other parameters, you can implement many strategies. You can put data correction in the settings. For example, in the “Orders grid” and “Tighten orders grid” you can correct the possible change of the price direction by specifying at what price change (in percentage points) the orders are canceled and new ones are set. The created scheme of work for the bot is saved by the button “Save new settings template”.
And there is a small subsection of additional settings. For example, “Capitalization” adds profit to the traded deposit, instead of crediting it to the wallet. “Logarithmic distribution” allows you to condense the orders to the desired price or make their distribution less dense when moving away from it.
The most important moment when starting a bot is the start. In order to start the bot at the right time, you must specify the parameters in the “Bot start filters”. To activate it, you need to check the box in the upper left corner. There are recommended parameters for the filter or you can set your own parameters.
In general, setting up a bot is not an easy task and requires knowledge of the market and understanding of the settings. Therefore, it is recommended to read on the website information on how to create a bot for trading on the Binance exchange, and all articles related to this topic.
Reviews